Friday, January 18, 2019

Pebbles | Guest Designer - Holiday Thank You Cards


Hello everyone!  I am so excited to be a guest on the Pebbles blog today.  With the holiday just behind us, I decided to make a couple of thank you cards to share with you. It's such a wonderful way to say thank you, for all of the amazing gifts you got! 


For my first card, I started by drawing a isosceles triangle to use as an outline for my Christmas tree.


I had an idea to create a Christmas tree using circles...the beautiful patterns and colors in the Cozy and Bright collection were absolutely perfect for this.   
     

I needed my circles to be very small, so I used a 3/4 inch circle punch to punch several circles from the patterned papers I selected...       


Next, I started gluing the circles in place, starting from the bottom and making sure to slightly overlap each one as I work my way up to the top.  

 
Here's a look at the finish tree!


To give the illusion that the tree is lit up, I added a bit of yellow paint. Stitched around the perimeter and then adhered it another layer of patterned paper.

A fussy cut flower was used as a tree topper and couldn't resist using those adorable gingerbread boy/girl die-cuts to embellish my card. To finish the card off I added a stamped sentiment and some enamel dots.       


For the second card I combine pattern papers from Merry Merry and Cozy and Bright collections to create a grid design.

I start by cutting my pattern paper into four rectangles (2 1/2 x 1 5/8)

Use a white gel pen and a ruler to add some faux stitching to each of the rectangles.


Next, I use a decorative die-cut with some vellum to add another layer to my card. 


Embellish with a few die-cut pieces from the Cozy and Bright collection.


Add a stamped sentiment as well as a piece of pattern paper to the inside of the envelope and really love how this turn out! 


If you have a photo of you or your love one opening that gift, why not enclose a copy of it in your card!

I hope I inspired you today to create a few Holiday thank you cards....

Have a wonderful day!

Supplies:


Wednesday, January 16, 2019

Happy Home | My Creative Scrapbook-January Tutorial


Hi My Creative Scrapbook fans! This month I combined the stamp set with some of the gorgeous patterned papers from the January Main kit to create this fun and beautiful page.


I had an idea to use a few different pieces of patterned papers to create a geometric tree, so I started by drawing a template with multiple sections...which reminds me of a quilting pattern.  Next, I cut the sections apart and place them onto the patterned paper I wanted to use, and then cut them out.   


Here's a look at the finish design....

Added some machine stitching.


Next, I started stamping the snowman image onto some smooth white cardstock with permanent charcoal ink. 


I used three different color Copic markers...Red...Light Blue...Green...to add a bit of color to the snowman scarf and hat.  I then used the coordination die to cut the snowmen out.


I matted my photo with patterned paper as well as some black cardstock, which help it stand out from the background. I arrange the stamped snowmen around my photo and adhered a few of them with foam tape for some extra dimension. I love the way the silver chain included in this months main kit added some movement to my layout, I simply attach the chain to each of the snowman's hand as I work my way around the page.
   

The pink foil, foam phrase stickers worked perfect as a title for my page.

The beautiful chipboard stickers and Die-cuts in this month's main kit was added around the page, which kept my circular design going and really love how this turned out!   


Here are a close-ups....


I hope you felt inspired today and if you're not a subscriber yet, give it a try. The kits are all so beautiful and you will not regret it!!!!

Thanks for stopping by :) xx


Thursday, January 10, 2019

Beach Life | Paper House - Paper Pad project


 Hi My Scrapping Friends!

This week on Paper House it's all about the paper pads products.

I used the Sun Drenched paper pad collection to document this cute photo of my son, enjoying a day at the beach.


Each of the beautiful 12x12 single sided paper pads comes with a coordinate cardstock stickers...which works great in finishing off any of your projects.
  
 I started my layout off by adding a couple strips of pattern paper across the my background paper, on a slight angle.  I then matted my photo and adhered it with foam tape to give it some extra dimension.


I arranged one large cluster starting from the top left hand corner of my photo, and working my way down and underneath, ending in the bottom right corner of the layout.  A few cardstock stickers, some die-cuts and fussy cut starfish were added to this cluster as well as a cut file title.     


Thanks for stopping by today! I hope I inspired you to create something beautiful using your Paper House products! 

Supplies:                                                                                                                               

Paper Pad/Paradise Found  KTSP-1057E
Paper Pad/Sun Drenched  PP-0081E


Tuesday, January 08, 2019

My Creative Scrapbook - Creative Kit Projects


Hi Scrapping Friends!!!

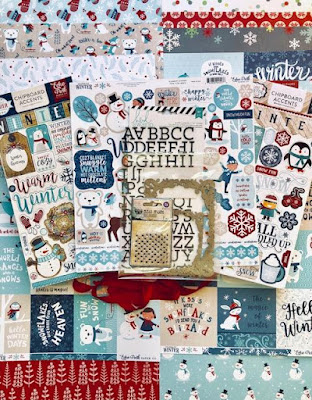
 This month I got to play with the beautiful Creative Kit from My Creative Scrapbook

Here's a quick summary of the products found in this month's Creative Kit....Echo Park 'Celebrate Winter' collection is the main collection, Chipboard Accents and Element stickers from this collection are also included in the kit. A couple of Creative Embellishments frames, A Prima clear stamp, Heidi Swapp Glitter Chipboard letter stickers, A few pieces of Simple Stories 'Sub Zero' patterned papers, some ribbon and Echo Park 'I Love Winter' Chipboard Accents. 

 Here are my projects and some close-ups created with this kit....

    
All Bundled up close-ups...


Love that frame from Creative Embellishments, I tucked it underneath my photo for another beautiful added layer.  


Snow Fun....


Close-ups...


How adorable are these chipboard and element stickers, all layer to create a beautiful cluster.


Here you can see I used the Prima stamp to add a fun design to my background! 

Winter Wonderland....


The 12x12 snowflake background cut file, one of this month's FREE cut file was used to created this beautiful page...


Winter Fun....


Close-ups....


 I hope you felt inspired today and if you're not a subscriber yet, give it a try. The kits are all so beautiful and you will not regret it!!!!

Thanks for stopping by :) xx


Saturday, January 05, 2019

Chilly | My Creative Scrapbook


Hi My Scrapping Friends!

A quick pop in today to share one of my layout using My Creative Scrapbook  January Main kit...The main kit this month is featuring the beautiful and playful 'Freezin Season' collection from Simple Stories as well as the die-cut Ephemera bit and pieces and the chipboard stickers from this collection. Also included in this kit is American Crafts Thickers, a couple of patterned papers from Photoplay 'Lost Mittens' collection and Let it Snow stamp and die set from Hampton Art.


 I started by selecting two of the beautiful patterned papers from the 'Freezin Season' collection and then added some stitching around the perimeter.  A few cut file snowflakes, cut from some white cardstock was tucked underneath and around the patterned paper, and I also added a larger snowflake to sit right on top, which created another layer for my page.
     

   A couple of frames cut from patterned paper, one was added to the upper right corner and the other to the lower left corner.  


Next I added a few embellishments and keeping them mainly to the middle of my page.

 I hope you felt inspired today and if you're not a subscriber yet, give it a try. The kits are all so beautiful and you will not regret it!!!!

Thanks for stopping by :) xx